I've been playing around with vermicomposting for a little over a year now. I started out with a simple Rubbermaid worm bin and a few borrowed worms. The bin didn't work out as well as I'd like because it became overrun with small flies. I kept the bin inside during the winter months and while it didn't smell, the flies were too much of an issue.
My second worm bin was much better built. It was basically the same style worm bin, but I had epoxied plastic mesh over all of the air holes. This bin worked great until I wanted to harvest some castings. You pretty much need to dump everything out and pick out the worms. There is a little more to it and you can use the worm's dislike of light to your advantage, but it was still a bit messier and more complicated than I liked.
My small garden really liked that worm compost though!
 |
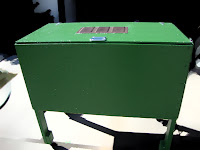
| My new worm bin |
The new bin is quite large, at four feet by two feet by two feet. There is a removable shelf on the bottom (not shown) for harvesting. It is well sealed from undesirable bugs but provides plenty of air circulation for my "pets". I decided to go ahead and insulate the interior so I could feel comfortable leaving my worms outside during the winter months. I'll probably just keep this in the garage at least this winter. I went ahead and caulked the interior joints and between the paint, the caulk, and the insulation I'm not too worried about the interior rotting away quickly.
This bin is designed as a "pass-through" system where I put food and new bedding at the top. The worms will work their way upwards and the finished compost will work its way towards the bottom. The compost should be much drier than what I had before because there will be enough airflow to keep the interior relatively dry. All I need to do is rake the bottom of the bin and have the castings fall through to the harvest tray.
I have another non-worm compost bin I want to make to help break down my lawn waste. That one will be much simpler to put together than this one was.
If you are remotely interested in a worm bin like this, I'd recommend checking out the VermBin24 page at Red Worm Composting. The bin I made was essentially the VermBin48 upgrade to the VermBin24. I made a minor substitution with the size of the bars at the bottom and how I made the air vents, but otherwise I stuck relatively close to the plans.


No comments:
Post a Comment